5-Input Dry Contact Sensor Configuration and Installation Guide
Sensor Overview
ALTA Wireless 5-Input Dry Contact Sensors can detect contact between multiple wired contact points, such as mechanical switches or relays, transistor switches, or contact plates. Five inputs detect contact independently and simultaneously.
Settings to Configure
- Name—Enter a unique name for your ALTA 5-Input Dry Contact Sensor to easily identify it in many iMonnit views and notifications.
- Heartbeat Interval (Minutes)—Set the expected time between communication from the device to the gateway while in the Normal State and without any data-triggering events.
- Aware State Heartbeat (Minutes)—Set the expected time between communication from the device to the gateway while in the Aware State.
- Contact 1-5 (various colors) Enter Aware State—Sets when the sensor enters the Aware State and communicates immediately. Options include when the loop is Closed, Open, or Changed.
- Time to Re-Arm—The time in seconds after a triggering event that the sensor will wait before recognizing additional triggering events.
Installation Steps
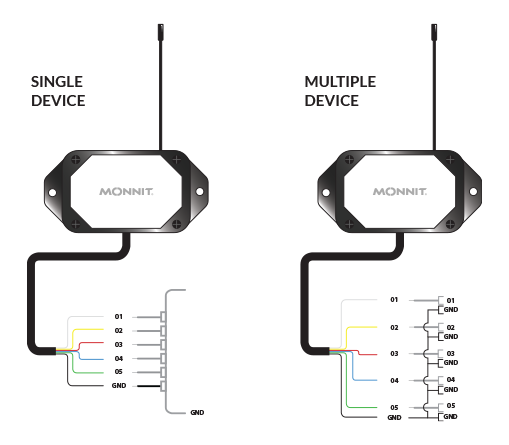
Integration with Single and Multiple Devices
- For a single device (where all the contact outputs are referenced to the same common ground)—Connect the contact input wires and the ground to available ports, wires, or screw terminals.
- For multiple devices (where each has its contact output and ground)—Connect the contact input wires to the available ports, wires, or screw terminals. All ground connections must be connected in common and then to the sensor's ground wire.
Note: If this is your first time setting up your Monnit system, you must set up an iMonnit account and connect your ALTA Gateway to iMonnit before registering your sensor. See this article for steps to start: Creating an iMonnit account.
Then, follow these five steps.
Step 1.
Remove the sensor from the package. If installing an industrial sensor, attach the antenna.
Step 2.
Register the sensor in iMonnit. Do not install the batteries until told to do so in iMonnit.
Step 3.
Determine the sensor’s installation location. We recommend placing the sensor in the location and ensuring it reports to the gateway before final installation. If you’re using an ALTA Site Survey Tool to perform a site survey to determine sensor installation location, see this article.
Step 4.
After verifying that the sensor is communicating with the gateway, mount the sensor using the supplied screws or double-sided tape. Ensure the sensor's lead wires have enough room to mount to the contact points.
Step 5.
Attach the wires to the desired endpoints.
WARNING: Use caution when interfacing with ALTA Dry Contact Sensors. Any external AC or DC voltages WILL DAMAGE the wireless sensor's electronics. Monnit is not responsible for troubleshooting, replacing, or reimbursing damages incurred by disregarding this warning.